 https://samahitaretreat.com/wp-content/uploads/2018/02/ambassador-how-works-img.jpg
520
850
Dr. Paul Dallaghan
http://samahitaretreat.com/wp-content/uploads/2024/01/samahita-logo-v2.svg
Dr. Paul Dallaghan2018-03-20 16:14:512023-11-02 05:29:43Yoga & Working Out
https://samahitaretreat.com/wp-content/uploads/2018/02/ambassador-how-works-img.jpg
520
850
Dr. Paul Dallaghan
http://samahitaretreat.com/wp-content/uploads/2024/01/samahita-logo-v2.svg
Dr. Paul Dallaghan2018-03-20 16:14:512023-11-02 05:29:43Yoga & Working OutPART ONE: Common injuries, posture management, appropriate pelvic force
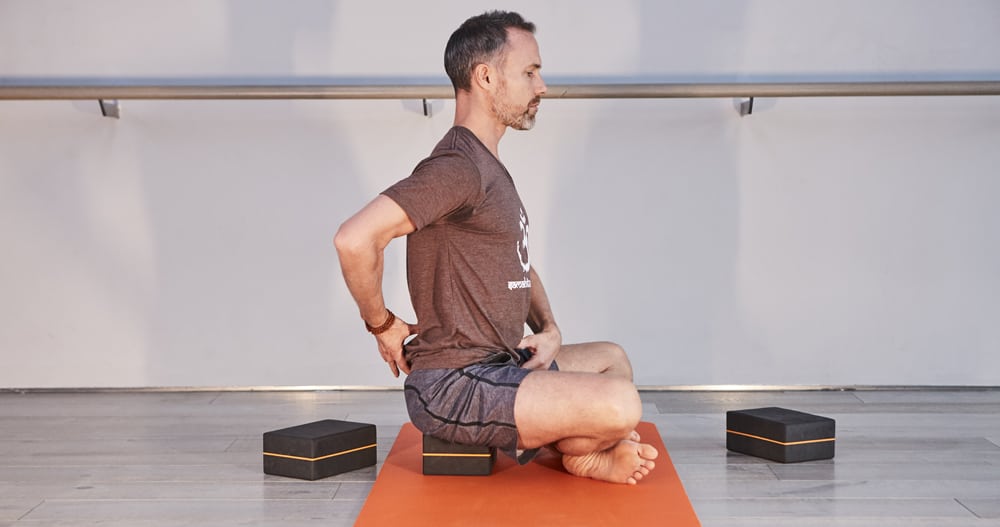
Highlighting the lower abdomen to support the lower back and sit better, pain to injury free.
Paul was interviewed for Yoga Journal China about injuries and yoga practice. As he explains, it is not as straight forward as addressing a body-tissue injury. That is merely one factor. You need to look at injuries brought from outside class and unfortunate injuries occurring in a pose, but also how you approach practice, where your focus is, how the breath fits in with injury prevention, the vital place of the lower abdomen in managing the body and thus any possibility of avoiding injury, and intelligent ways to modify that help you heal and grow instead of worsening the issue or staying stuck. This interview transcript is from the spoken word, so slightly different than when written, and is brought to you in three parts.
PART ONE: Common injuries, posture management, appropriate pelvic force
WHAT IF I’M ALREADY INJURED, AND I NEED TO MODIFY; HOW DO I MODIFY?
If you’re already injured do you avoid or keep something up? More current scientific wisdom definitely recommends movement; therefore, to address an injury, you need good postural management and knowledge about how to move in a limited way close to or around the site of injury.
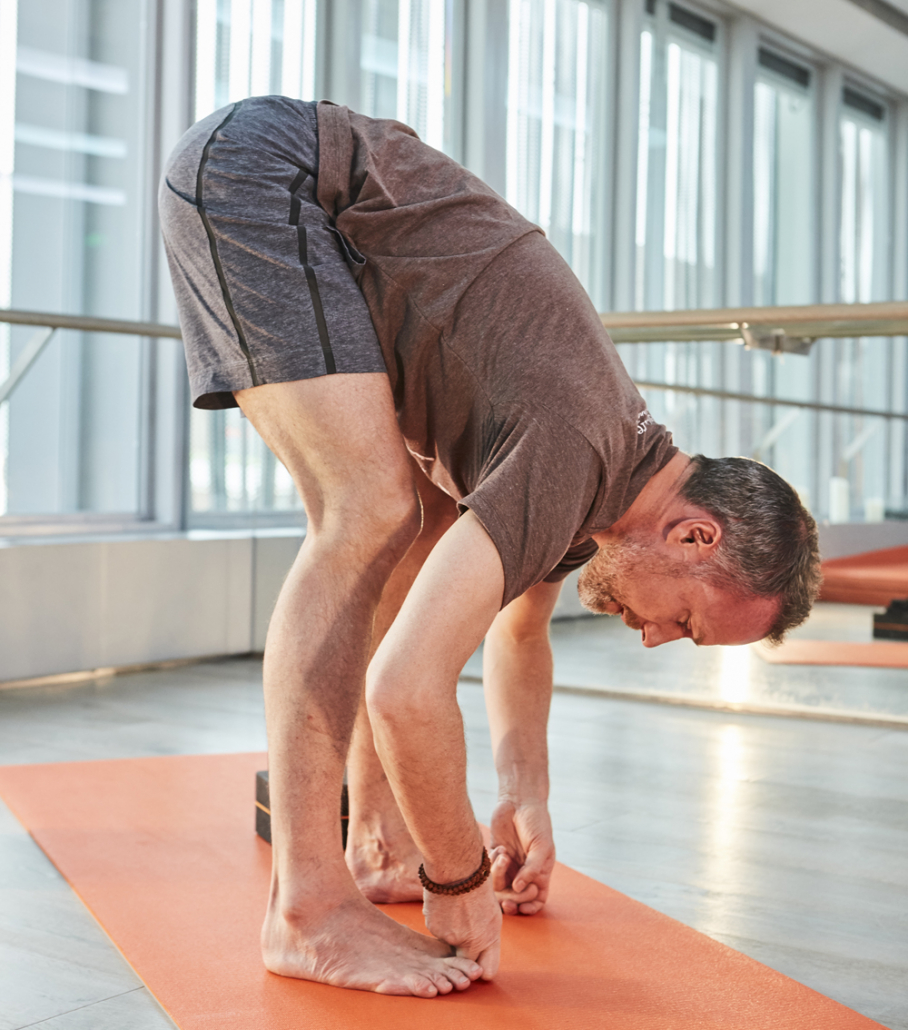
Bend those knees, draw in the lower abdomen, manage the entire body as you go into a powerful bend, that is not about a stretch but empowering the center and strengthening the hamstring attachment site as opposed to pulling it further. The entire leg to core of spine benefits. Do with strength in legs.
Let’s look at a good example of a common injury either due to, or showing up in, a yoga practice – hamstring pulls. This is because people think yoga is more about flexibility and stretching when such an approach can lead to pulls of the ligament on the attachment site and the typical common one is on the ischial tuberosity (sit bone). If you avoid moving and avoid stretching, you’ll just find that 3 months later, though you don’t feel the pain, the injury hasn’t healed; and when you later return to your yoga practice, you’ll feel the collected scar tissue and the strain, and you can easily reinjure yourself.
So instead to support appropriately, you need to learn how to move around it; in this case with the knees bent; you start by supporting posture through engagement of the lower abdomen and pelvic floor which influences the other muscles in the pelvis. You switch on particular leg muscles, including engaging your quadriceps and your inner legs (the adductors); this gives you a whole suite of muscles that are working and acting in a supportive way around the injury site; this allows the belly of the muscle to gets its length and support without pulling at the same injury spot. In a few weeks, you will find that you have strengthened the attachment site by accompanying muscles that attach around the same site or close to it. And, therefore, you manage the injury by managing the posture through supportive activity around it, carried through within movement.
Another example is that people will come to a yoga class with a degree of back pain, which can be indicative of different physical injuries and even emotional injuries in life. I have met people who say to me, “Paul, when I go to a yoga class, it just makes my back pain worse.” I find this so unfortunate to hear yet I understand that it reflects an unfortunate reality that takes place in some yoga classes – where the teacher has not been able to successfully guide the students to identify and use centered, focused, grounded support to manage the back, so instead it leads to worsening the back pain rather than helping it.
As a teacher, offering modifications is your job; you have the chance to help people self-correct, to offer them proper focused work, to interrupt the rigidity.
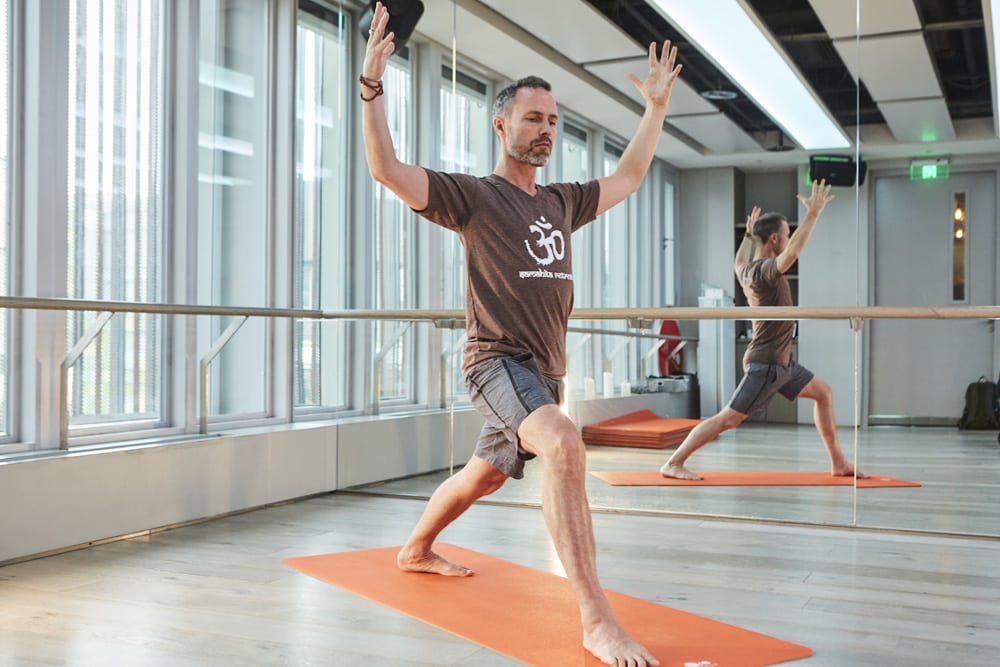
The warrior pose is classic, yet often done without its true warrior support. Here we make sure the back leg controls the power, the front leg merely lowers into a place appropriate for you now. And major emphasis is given to the support of the spine via the door of the lower abdomen. Many collapse here without realizing so the aim is to draw in, posterior tilt the pelvis, power the back leg, then lower the front leg slowly.
WHAT IF I COME INTO CLASS WITH A PRE-EXISTING CONDITION, LIKE BACK PAIN OR KNEE PAIN, AND THAT CONDITION IS WORSENED IN CLASS?
In order to manage the spine and support the back, you need to go through the doorway of the lower abdomen to the deeper spinal muscles which work with the other upright spinal muscles. As you can see in this photo of the warrior position, there is a small degree of rotation in the spine which helps to trigger some of the deeper supportive muscles that attach firmly to the spine at diagonals, innervated by individual spinal nerves, such as multifidus and rotators. By first taking such a constructive, supportive approach as your base, you then let the movement and activity follow that, where the outcome should be improvement through this support to reduce the condition. But often a yoga teacher will either fail to pay attention to this, or the teacher might lack the understanding, so that it can unfortunately worsen the condition, and the person leaves with aggravated back pain instead of getting support to overcome it.
You can think about this as good engineering or good architecture. You need to take care of establishing a good foundation: columns and cross beams. In a similar way, the legs feed into the pelvic body, and they attach to the spine through the psoas. Your doorway to activate in that is through engagement of the lower abdomen and pelvic floor in appropriate tones. And in so doing, you provide a developed, structured support. Just like being in a well-built building, you now have an environment in which you can bend or move without falling into a compromised position or a mishap. This gives you an intelligently constructed solution that provides a strength-based environment to guard against worsening the condition and limit the possibility of other injuries, rather than one based in fear around the nature of the injury. This distinction is important; when something is fear-based (which is very common) there is never a solution in that.
WHEN YOU REFER TO “APPROPRIATE TONES”, WHAT DO YOU MEAN?
A very common misunderstanding in yoga is that engagement refers to just one type of forceful engagement. The result is that the engagement can be too high, too strong. A good example is if you overdo the pelvic floor squeeze: the fact that you’re even squeezing is wrong; the appropriate tone would be holding. You can think about this just as one holds a bottle with their hand, they don’t squeeze the bottle. It would be unnecessary. It would be a waste of energy. It would be an inappropriate tone. Unfortunately, however, through yoga when there is a blind command of “mula bandha”, the result can be that people squeeze the pelvic floor, and maybe even squeeze too much, and in that case it’s actually the anal sphincter that is being squeezed. This actually results in an increased heat, which can actually bring you bad hemorrhoids, affect constipation, even affect ladies’ menstrual activity.
Then the other side of that is you don’t’ engage it at all, and this important powerful muscle at the base of the body is under-toned, which puts more pressure on the internal organs and the whole network of lumbar sacral nerves, which is commonly found with poor bladder management and incontinence. The appropriate tone is the engagement that fits the degree of force/counterforce, in that situation, at that moment. For example, when you’re sitting upright, an appropriate tone of pelvic floor/lower abdomen might be 2-3 out of 10. When you’re in an asana like paschimottanasana, then the appropriate tone might be a 5-6. When you’re balancing on your arms in an arm balance pose where you have to hold your weight in the rest of the body, then the appropriate tone might be up at 8. Now it’s inversely related to the amount of time spent in it. So the 8 in a balance is held for a short period of time, 20 seconds maybe. The level 5 in a paschimottanasana, is held for medium time which can vary between 30 seconds and 2 minutes. The level 2-3 in the sitting posture can be held for minutes to hours. And in a sense, this is used in your sitting, standing daily activity where you might move between a level 2-3 to 5.
Part Two coming soon…

Dr. Paul Dallaghan’s expertise with breathwork, body and meditative practices comes from three sources: (1) three decades of daily dedicated practice and teaching these techniques; (2) uniquely acknowledged in the Yoga tradition by the title of “Master Yogi-Prānācharya (expert in breath)”, following an immersion in the original culture through one-on-one direct training in practice and study of ancient texts; (3) a PhD in doctoral scientific research at a leading US university (Emory) covering both the tradition and science of yoga and breath practices in terms of stress, health and aging. As a result, Paul occupies a unique space to impart genuine teaching and science on the breath, body, and meditative practices, seen as a Teacher-of-teachers and identified to carry on the tradition of Pranayama. His sincere and ongoing role is to teach, write and research, to help put out experienced and authentic information on these areas of how we live, breathe and be, to help people improve their mental and physical health, and live more fulfilling lives.
For more on his background see his bio
More from the Samahita Blog
https://samahitaretreat.com/wp-content/uploads/2018/02/ambassador-how-works-img.jpg
520
850
Dr. Paul Dallaghan
http://samahitaretreat.com/wp-content/uploads/2024/01/samahita-logo-v2.svg
Dr. Paul Dallaghan2018-03-20 16:14:512023-11-02 05:29:43Yoga & Working Out https://samahitaretreat.com/wp-content/uploads/2018/02/IMG_71021-1.jpg
400
800
Dr. Paul Dallaghan
http://samahitaretreat.com/wp-content/uploads/2024/01/samahita-logo-v2.svg
Dr. Paul Dallaghan2018-03-20 00:00:002024-02-15 09:22:24Breathe Through Your Nose
https://samahitaretreat.com/wp-content/uploads/2018/02/IMG_71021-1.jpg
400
800
Dr. Paul Dallaghan
http://samahitaretreat.com/wp-content/uploads/2024/01/samahita-logo-v2.svg
Dr. Paul Dallaghan2018-03-20 00:00:002024-02-15 09:22:24Breathe Through Your Nose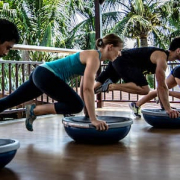 https://samahitaretreat.com/wp-content/uploads/2018/07/@maroverli.com_fitness-61-1.jpg
299
500
Dr. Paul Dallaghan
http://samahitaretreat.com/wp-content/uploads/2024/01/samahita-logo-v2.svg
Dr. Paul Dallaghan2018-03-20 00:00:002024-02-15 09:22:23Understanding Yoga & Fitness
https://samahitaretreat.com/wp-content/uploads/2018/07/@maroverli.com_fitness-61-1.jpg
299
500
Dr. Paul Dallaghan
http://samahitaretreat.com/wp-content/uploads/2024/01/samahita-logo-v2.svg
Dr. Paul Dallaghan2018-03-20 00:00:002024-02-15 09:22:23Understanding Yoga & Fitness https://samahitaretreat.com/wp-content/uploads/2018/03/article_november_2013.jpg
315
1000
Dr. Paul Dallaghan
http://samahitaretreat.com/wp-content/uploads/2024/01/samahita-logo-v2.svg
Dr. Paul Dallaghan2018-03-13 06:52:062023-11-02 04:40:19Integrity in Yoga
https://samahitaretreat.com/wp-content/uploads/2018/03/article_november_2013.jpg
315
1000
Dr. Paul Dallaghan
http://samahitaretreat.com/wp-content/uploads/2024/01/samahita-logo-v2.svg
Dr. Paul Dallaghan2018-03-13 06:52:062023-11-02 04:40:19Integrity in Yoga https://samahitaretreat.com/wp-content/uploads/2018/03/Paul-standing-banner.jpg
1090
2000
Dr. Paul Dallaghan
http://samahitaretreat.com/wp-content/uploads/2024/01/samahita-logo-v2.svg
Dr. Paul Dallaghan2018-03-13 06:49:442023-11-02 04:45:35Why Do I Practice?
https://samahitaretreat.com/wp-content/uploads/2018/03/Paul-standing-banner.jpg
1090
2000
Dr. Paul Dallaghan
http://samahitaretreat.com/wp-content/uploads/2024/01/samahita-logo-v2.svg
Dr. Paul Dallaghan2018-03-13 06:49:442023-11-02 04:45:35Why Do I Practice? https://samahitaretreat.com/wp-content/uploads/2018/03/Dear-friends.jpg
315
1000
Dr. Paul Dallaghan
http://samahitaretreat.com/wp-content/uploads/2024/01/samahita-logo-v2.svg
Dr. Paul Dallaghan2018-03-13 06:40:512023-11-02 04:40:20Yoga as a Light on Life Change
https://samahitaretreat.com/wp-content/uploads/2018/03/Dear-friends.jpg
315
1000
Dr. Paul Dallaghan
http://samahitaretreat.com/wp-content/uploads/2024/01/samahita-logo-v2.svg
Dr. Paul Dallaghan2018-03-13 06:40:512023-11-02 04:40:20Yoga as a Light on Life Change https://samahitaretreat.com/wp-content/uploads/2018/03/yoga-retreat-ski-holiday1.jpg
315
1000
Dr. Paul Dallaghan
http://samahitaretreat.com/wp-content/uploads/2024/01/samahita-logo-v2.svg
Dr. Paul Dallaghan2018-03-13 06:39:162023-11-02 04:45:36Rest and Recover
https://samahitaretreat.com/wp-content/uploads/2018/03/Dear-friends.jpg
315
1000
Dr. Paul Dallaghan
http://samahitaretreat.com/wp-content/uploads/2024/01/samahita-logo-v2.svg
Dr. Paul Dallaghan2018-03-13 06:35:262023-11-02 04:40:21Finding Yourself in the Midst of Constant Change
https://samahitaretreat.com/wp-content/uploads/2018/03/yoga-retreat-ski-holiday1.jpg
315
1000
Dr. Paul Dallaghan
http://samahitaretreat.com/wp-content/uploads/2024/01/samahita-logo-v2.svg
Dr. Paul Dallaghan2018-03-13 06:39:162023-11-02 04:45:36Rest and Recover
https://samahitaretreat.com/wp-content/uploads/2018/03/Dear-friends.jpg
315
1000
Dr. Paul Dallaghan
http://samahitaretreat.com/wp-content/uploads/2024/01/samahita-logo-v2.svg
Dr. Paul Dallaghan2018-03-13 06:35:262023-11-02 04:40:21Finding Yourself in the Midst of Constant Change